TRAVEL DIARY: CRUISING AROUND ALASKA // LETIFFANYSHOW✨

hello-friends-e1502697417909.jpg

Welcome back to my blog 

I spent two weeks cruising around Alaska and saw some of the prettiest things nature has to offer. This 14 day cruise set sail from Long Beach, California and it was the first time this ship went to Alaska and back in one piece. All aboard the Carnival Miracle, we’re going on a journey!

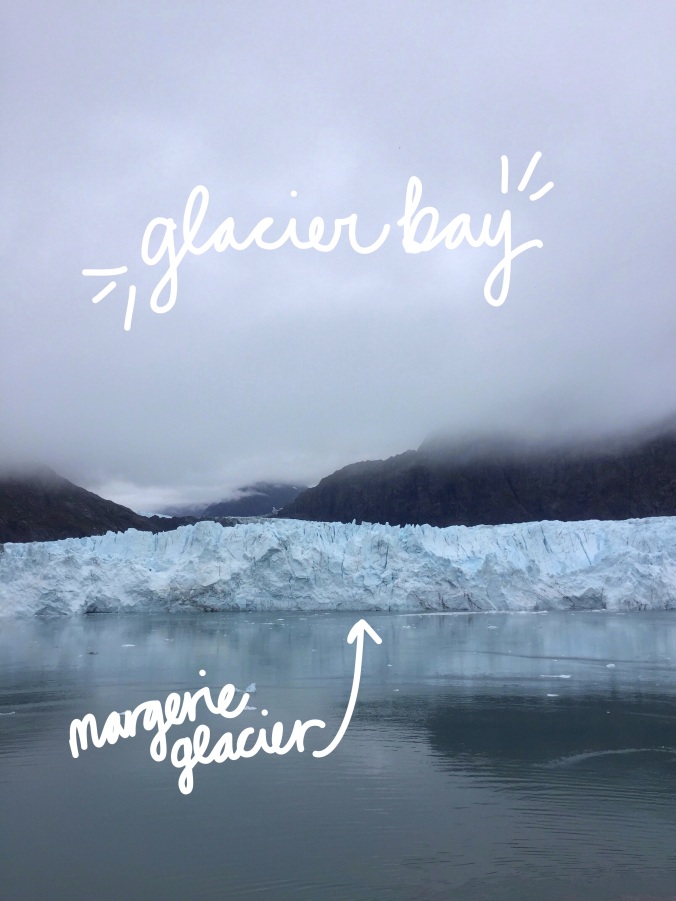
We stopped at 6 ports: Ketchikan, Icy Strait Point/ Hoona, Juneau, cruised around Glacier Bay, Skagway, and Sitka. We also made a stop in Vancouver, B.C.! WOO CANADA! 🇨🇦

Take a look at my trip through my camera lens and I’ll meet you on the other side!

3-2-1 GO!

IMG_0453

About meIMG_2182IMG_8863IMG_8861IMG_8862IMG_0455IMG_2291IMG_0449

Alaska is such a beautiful place and it never fails to amaze me. I was surprised by how small these cities were. Like the population of Ketchikan is 8208 people and Hoonah has a population of 745 people! In comparison, Los Angeles has a population of 4 million people! That size difference though..

There are a LOT of fine jewelry stores in Alaska. I’d say 60% of the stores there sold fine jewelry. If that’s your thing, I heard there’s pretty good deals on fine jewelry in Alaska. Since I went in September, it was the end of tourist season and the shops were about to close down until next year. That means…huge clearance sales!! The Alaskan T-shirt company was having a 50% off everything sale so I went a bit crazy there. Don’t let the name fool you, they sell way more than just t-shirts!

TIFF TIP: Look for coupon books. They’re free! These coupon books have hella deals on souvenirs! These books are usually located at the welcome centers and sometimes in front of a souvenir store. The coupon book we found had coupons for Ketchikan, Juneau, and Skagway, which are the bigger cities.

Carnival offered many shore excursions but I don’t think you have to do shore excursions in order to have fun. The prices range from $ to $$$$ but we stuck with the ones that were more affordable. The more expensive ones were usually whale watching or helicopter rides, which weren’t really appealing to us. We bought shore excursion tickets for 4 of the 6 port of calls.  We mainly did the ones that gave you an overall tour of the city to learn more about the cities in Alaska. On the days we didn’t do shore excursions, we just walked around and explored the city on our own.

The ship also made a stop at Vancouver, B.C. It was almost like I never left the States because it looked like the U.S. I got to try Tim Hortons, which is a Canadian fast food chain known for it’s coffee and donuts. I got a ice vanilla latte and a chocolate chip muffin. I thought the coffee was pretty good and the muffin I got was delicious! Vancouver kind reminds me of downtown LA where the driving is crazy and there’s cars everywhere. We had a limited amount of time in this big city so I’d love to go back one day and fully explore what it has to offer.

The ship itself was really fun. Carnival cruise lines calls themselves the fun ship! There were so many activities planned that we were pretty much occupied throughout the days at sea. I went to my first art auction and learned so much about the art world. There was an opportunity to guess how many N’s were hidden in the painting and I won! The prize was an art piece. How cool is that?! I also attended many lectures that varied from fitness and how to live an healthier lifestyle to just a lecture about food. There were also cooking demonstrations by the onboard executive chef and I won a raffle to taste the food he cooked. IT WAS DELICIOUS!! …and awkward because literally everyone is watching you eat. There are so many things to do on the ship that you’ll definitely never be bored.

If anything, go up to the Lido deck buffet and pig out 🐷😂. You can find me where the food is!

cruising-tips-e1505978278397.jpg

Thinking of going on a cruise? Here are my tips!

  1. Bring a highlighter! Sounds weird right? But they deliver a schedule of events every night to your room so that you can plan out what events you want to go to. A highlighter would have been nice to make the events I like pop out.
  2. Pack some shower flip flops! I don’t know if it’s weird but I wore flip flops in the shower and around my room. I mean you don’t know who’s nasty lil feet have been around that room and even though they clean it, yikes. Better safe than sorry!!
  3. Bring some workout clothes! My ship had a nice gym on board and it was nice to work off some of the free ice cream I was eating like everyday. OH and the french fries.. I love french fries ❤
  4. Coupon books! Like I mentioned before, definitely lookout for these coupon books. They’ll save you some money which can add up especially when you’re shopping for a lot of people.
  5. Take advantage of the free classes! My cruise ship always offered ballroom dance classes but I was too much of a chicken to try it. But I think ballroom dancing would be useful one day or something to know. There were also seminars that range from topics like increasing your metabolism to intro to photography.
  6. Raffles! Keep your eye out for raffles! They’re always giving away free stuff. All you have to do is show up, put your entry in, and hope they pick yours! I won a couple raffles. Even though its just little things, it’s still exciting to see who wins.
  7. Be fearless! You’ll never see these people ever again so why not try everything? I lowkey wish I auditioned for lip sync battle or did those ballroom dances. Maybe next time…

I hope you enjoyed a little glimpse of Alaska. I prefer going on cruises than Chinese tours because you don’t really have a specified wake up call. Plus, you don’t have to pack up your belongings every night and drag your luggage to the tour bus. It’s nice to just chill out by the pool and look at the ocean. The ocean made me feel like there’s so much out there and it gave me hope that whatever I’m going through will resolve in time and everything will be okay.

As always, thank you so so much for stopping by! I hope you enjoyed reading about my journey through Alaska. I could go on and on about it but this post would go on forever. If you have any questions about anything, leave a comment below and I’ll try my best to answer it… 🙂

Don’t forget to like, comment and follow my blog to be notified when I post! Have a beautiful day and don’t forget to shine bright, you’re beautiful ❤


Shine bright, peace out.✌


❤ , TIFF


psst… check out my last post here!

psst… Can you believe it’s already Fall? Only 3-ish months left of 2017. Geez time sure flies by…


Where to find meh  :

Pinterest:@letiffanyshow

Tumblr: http://teafaakneeshow.tumblr.com

Twitter: @letifffanyshow

Youtube: @letiffanyshow


DIY TESTED: EGG WHITE MASK // LETIFFANYSHOW✨

hello friends 5

Welcome back to my blog!

Happy September!

Today, I’m going to try a DIY egg white mask. When I first heard about this mask, I thought I was being trolled. Like egg whites on your face? Gross. But as crazy as it sounds, there seem to be some awesome benefits. So of course I had to try it out! If you want to know how this mask works, just keep on reading!

BEFORE YOU TRY THIS DIY: If you have sensitive skin, think before you try this DIY. If you’re allergic to eggs, stay away from this DIY. If you’re a vegan or don’t like eggs, uh its up to you! I am not a skin care professional. Just a blogger who loves to try new things! 🙂

egg mask infographic

You will need:

» 1 egg

👆 Yep, you read that right, all you need is one egg!

All you have to do is crack that egg open and separate the yolk and egg white. (add another egg to that yolk and you can have an omelette. yum!) Then use a fork to froth up the egg whites. It takes a little bit of work but oof that was a workout! 💪 Finally, use your fingers and apply a layer to your face. Let it dry for about 10-15 minutes and wash off with warm water.

This mask is said to temporarily tighten your skin, giving you a short term face lift (lol). I don’t think my face looked lifted but okay. It is also supposed to give you this beautiful glow. Did I have a glow? Yes! My skin felt so much smoother than before. Gotta have that flawless base before slapping on some makeup, am i right?

My main skin concern were the pores on my face. They were so visible and the mask supposedly shrinks your pores. I did notice my pores shrink a little so I think it will definitely help once I get onto a routine.

So did it work? 

YES! It did work but in my opinion, you’ll have to do it regularly to really get the affects. My skin felt softer and tighter plus my pore kind of shrunk.

Would I do it again? 

Honestly, probably not often. It didn’t smell very good and you are putting egg whites on your face. There’s also a concern with bacteria and such.

But if you’re curious, definitely give this mask a try! The ingredients are so simple. You can also add a few teaspoons of lemon juice into the egg mask if you want some cleansing effect.

If you think putting egg whites on your face is gross (cause it is..), but want similar effects, check out these options!

» Skin Food Egg White Pore Mask ($10.50) // here

» Skin Food Egg White Pore Hot Steam Pack ($13.00) // here

Let me know what you think of this mask. Gross or no?

As always, thank you so so much for stopping by! Like, comment letting me know what other DIYs I should try! Hit that follow button to be notified when I post and I hope you have a beautiful day. Don’t forget to shine bright, you’re beautiful ❤


Shine bright, peace out.✌


❤ , TIFF


psst… check out my last post here!

psst… more info about the benefits of this mask here!


Disclaimer: I am definitely not a skin care professional. Please try this DIY at your own discretion. As always, all opinions are my own. Not sponsored. Just a blogger who loves to try new things!


Where to find meh  :

Pinterest:@letiffanyshow

Tumblr: http://teafaakneeshow.tumblr.com

Twitter: @letifffanyshow

Youtube: @letiffanyshow


SH*T EVERY STUDENT NEEDS TO KNOW ABOUT // LETIFFANYSHOW ✨

hello-friends-2-e1502697216384.jpg

Welcome back to my blog 

Today, I am back with a post about apps you may or may not know about! I know when I was in college, these apps really helped me get through the year. Best of luck with the new school year and lets get started!

apps-e1503546100470.jpg

Good Reader// $4.99// If you prefer PDF textbooks over paper textbooks, then good reader is a wonderful app for you! It allows you to read and highlight important information. You can even draw from the tip of your finger.

Notability// $9.99// This app is great if you love taking notes on your tablet. You can change up the “paper” style and write directly onto the document using a stylus. I mainly used this app for physics and it worked great to do practice problems and draw out physics diagrams.

IMG_0447.PNGIMG_0444.PNG

Spotify// Free// If you don’t know what spotify is, don’t worry, I didn’t discover it until late freshman year of college. Spotify is free and it allows you to listen to music on your computer, tablet, and/or phone. You can search any artist and make playlists to share with your friends. You can also upgrade to premium and listen to ad-free music, listen offline (like on your phone), and get better sound quality…according to them.

IMG_0445.PNG

A look into one of my Spotify playlists! You can follow me on Spotify @letiffanyshow

StudyBlue// Free// This app is great if you are always on the go but you gotta study. Those of you who take public transportation to campus would definitely benefit from something like this. You can create, study and share your flashcards for free. I love that you can customize your flashcards using audio and images. It also tracks your progress and you can set a reminder that it’s time to study/review your material.

Duolingo// Free// Duolingo is awesome. It is a free app where you can learn different languages on your smart device. I use mine to enhance and practice my Spanish. Now there are 23 languages you can learn, such as French, German, Danish, Vietnamese, Irish, and of course, English. You can learn a new language from the palm of your hand (and its a great time passer on the toilet 🚽 haha!)

IMG_0446.PNG

I’m not far into the progress because I haven’t used it in a while but it’s a fun app!

Venmo// Free// This app isn’t a study app but it is really useful in college. You link your debit card to your venmo account and you are able to transfer money to your friends with a push of a button. Be careful tho, make sure you are aware of how much money is in your account. But this app is really useful especially when you split purchases with your friends or housemates.

DaisyDisk// $9.99// If your computer is running out of space and you have no idea why, DaisyDisk can help you with that. Although it was $10 for the app, I immediately thought it was worth it when I started using it. This is an app for OS X that analyzes your hard disk drive and helps you easily clear unwanted things. I love it especially because it breaks down what’s in the “other” portion of your hard drive. I don’t know about you but that “other” section is the reason why my laptop space is full.

Screen Shot 2017-07-30 at 12.41.05 PM.png

Welcome to my hard drive disk! This is what the app looks like from the inside.

random-extras.jpg

♥ Clutch Prep // here

This website saved my arse in organic chemistry 1 and 2. It’s a free website you can sign up for that provides video guides that follow your college textbooks! They offer mostly science courses but also some math courses and accounting.

Screen Shot 2017-08-24 at 10.40.54 PM.png


♥ Cheap textbooks

↠ Bigwords.com // here

Screen Shot 2017-08-23 at 10.44.54 PM.png

My biggest tip for saving money in college is, DO NOT BUY BOOKS FROM YOUR CAMPUS BOOKSTORE!! Sorry campus bookstores but y’all overpriced. Going into college, my brother showed me this website. Copy and paste the ISBN of your textbook and this website will generate the cheapest option for you! If you want to rent the textbook, you can change the settings to find the cheapest rent option available for your book! Happy bargaining!

not-a-fan.jpg

↠ Abesbooks// here and Albris// here

These two websites often have coupon codes that work on textbooks! So make sure to check google for some coupon codes before ordering! Sometimes it’s not a lot but saving a little money is better than nothing.

pro-tip.jpg

♥ Fun and easy way to make flyers/infographics/graphics

↠Canva.com// here

If you are in a club or in greek life, you may have to make flyers for events. This is where canva comes in handy. You can easily make a free account and start designing your flyer. Most of the designs are free but if you want a fancy design, you will have to pay for it.

Walk for Change.jpg

An example of a flyer I made for the Sexual Violence prevention club I was in!

♥ Cute desktop wallpapers

↠Design love fest // here

Dress up your tech using cute desktop wallpapers! Design love fest has some of the most aesthetically pleasing desktop wallpapers I’ve ever seen. New ones are constantly released, which allows m\e (and you) to change up our desktop background! Below are some of my favs with the artist’s name listed!

Zoe Wodarz // click here

 You by Katie // Click here

♥ Angela Mckay // Click here

I hope you discovered something new today! Always keep learning new things and keep that noggin updated with new information.

As always, thank you so so much for stopping by! Make sure to like this post and comment to let me know what other apps I should try! Have a beautiful day and don’t forget to shine bright, you’re beautiful ❤

Shine bright, peace out.✌


❤ , TIFF


psst… check out my last post here!

Disclaimer: All opinions are my own. I used my own money to buy these products. These links are non-affiliated, which means I don’t make any commission from the links you click on. I just want to make it easier for my readers to see the products I’m talking about. 🙂 


Where to find meh  :

Pinterest:@letiffanyshow

Tumblr: http://teafaakneeshow.tumblr.com

Twitter: @letifffanyshow

Youtube: @letiffanyshow

MAKEUP PRODUCTS EVERY COLLEGE STUDENT SHOULD OWN • LIPS EDITION // LETIFFANYSHOW✨

hello-friends-6.jpg

Welcome back to my blog 

Pucker up, friends! Welcome to part 3 of the MAKEUP PRODUCTS EVERY COLLEGE STUDENT SHOULD OWN series! If you haven’t seen my past two posts on face and eyes, check them out here and here!

Today it’s all about the lips! 💋 I love lip products. I love how every lip color adds a little pizazz to your look and GAH I’m obsessed. On a typical school day, I only wear lip balm to keep my lips from feeling dry BUT when I’m feeling a bit saucy, I whip out my liquid lipsticks!

Like the last two parts of this series, I will be including both high end and lower end products to help you with whatever price point you’re at! And of course, don’t forget to check out drugstore weekly ads because something is always on sale! Happy bargain shopping!

Step 1:

exfoliate.jpg

To have a flawless finish to your lipstick/liquid lipsticks, you must start with a smooth base. That’s where the lip scrubs come in. There are a lot of lip scrubs in the market but I love this homemade recipe from The Wonder Forest (original recipe here). It’s made with all natural ingredients and you probably have them at home as we speak! Go give it a try!

You will need:

  • 1 tsp brown sugar
  • 1 tsp white sugar
  • 1 tsp of honey
  • 1/2 tsp of olive oil

Mix all the ingredients and BAM you have a lip scrub! Massage it onto your lips for about 20 seconds and wipe off for smoother lips!

Step 2:

chapstick.jpg

Chapped lips is a big no no especially if you want to look good during your exam. I mean if you don’t do well, at least you look good doing it, right? (lol im kidding) NOHBODY likes a chapped lip. It just feels so…uncomfortable! So I’ve included a list of lip balms that I’ve tried and loved and I hope you find one that fits your needs!

  • Chapstick total hydration (coconut hydration)- $2.99-get it here

I lovveeee anything coconut flavored (but not actual coconut..) and this chapstick has the perfect hint of coconut flavor. It has a 3 in 1 hydration system that keeps your lips looking gooood.

  • EOS Lipbalm -$3.29- get it here

Some people aren’t a big fan of this lip balm and at one point, it gave people weird rashes on their upper lip but I like it xD My favorite flavors are Sweet Mint and Summer Fruit. It is infused with Vitamin E, which moisturizes and protects your lips from harsh conditions!

  • Burt’s Bees- $3.29- get it here

I’ve tried this lip balm in so many different flavors and loved them all. My favorites are the Coconut & pear, Pomegranate, and Beeswax. This lip balm is made with 100% natural ingredients and is infused with Vitamin E to renew your lips! It tastes good and makes your lips feeling moisturized af.

Step 3:

lip-color.jpg

As I mentioned before, I don’t always wear lip colors. But sometimes I just want to dazzle up a bit! Here are some lip colors that I’ve tried and love!

  • ColourPop

I’m so glad I discovered ColourPop lippies. It’s great quality lip color for a very affordable price. The only downside is that it’s hard to pick out colors that would look good on you cause it’s all online. Also, you have to wait for shipping and I’m impatient! HAHA Word on the street though, it’s coming to Sephora!!! Yasss I’m so excited! 🙌

Ultra Satin Lip-$6.00

♥ Echo Park// here // satin matte peachy nude color

♥ Lyin King// here // satin matte raspberry color

♥ Tulle//here// matte dusty burgundy color

Lippie Stix- $5.00

Brink// here // matte terra-cotta rose color

Crack me up// here // matte griege rose color

♥ Faded// here // creme rosey coral color

♥ Button // here // satin peachy pink color

  • Maybelline

Color Sensational Creamy Matte Lipstick-$7.49

♥ Touch of Spice (#660)// here// Beautiful mauve matte color and is really creamy!

Color Sensational The Buffs Lipstick-$7.99

♥ Untainted Spice (#950)// here// Beautiful nude color my light-medium skin tone.

  • NYX Professional Makeup

NYX Lingerie Liquid Lip- $6.99

♥ Ruffle Trim (LIPLI04)// here // large range of nude-ish colors for any skin tone! This one looks natural with my light-medium skin tone.

NYX Liquid Suede- $6.99

♥ Soft-Spoken (LSCL04)// here // Waterproof and long lasting liquid lipstick! It also dries matte.

NYX Butter Lipstick- $6.49

♥ Root Beer Float (aka Pops) (BLS17)// here // It applies like butter (hence the name ‘butter lipstick’) and I love how low-key the color is!

  • Tarte

Tarteist Quick Dry Lip Paint- $20

♥ Delish // here // Rosey-mauve color- it’s long lasting and dries matte.

and…

That is it for my lip essentials/routine! I never know what kind of lip colors I should get.

lip rec

As always, thank you so so much for stopping by! I hope you liked this series. Like, comment letting me know when you go back to school (I’m curious!) and press that follow button to be notified when I post! I hope you have a beautiful day and don’t forget to shine bright, you’re beautiful ❤

Shine bright, peace out.✌

❤ , TIFF


psst… check out my last post here!

Disclaimer: All opinions are my own. I used my own money to buy these products. These links are non-affiliated, which means I don’t make any commission from the links you click on. I just want to make it easier for my readers to see the products I’m talking about. 🙂 


Where to find meh  :

Pinterest:@letiffanyshow

Tumblr: http://teafaakneeshow.tumblr.com

Twitter: @letifffanyshow

Youtube: @letiffanyshow

MAKEUP PRODUCTS EVERY COLLEGE STUDENT SHOULD OWN • EYES EDITION // LETIFFANYSHOW ✨

Hello friends 3

Welcome back to my blog 

I don’t know about you but I yawned a lot through school so eye products with a long staying power were a must! If not, you would see a girl with panda eyes walking around campus. How embarrassing!

Welcome to part 2 of the MAKEUP PRODUCTS EVERY COLLEGE STUDENT SHOULD OWN series! Today we’re talking about eyes. Typically for eyes, I only wear mascara. But that mascara has to have really good staying power and curling power or else…panda eyes.

Like my past post where I talked about essential face makeup (if you haven’t seen it yet, click here), I’ve included both high end and lower end products to help you discover products in whatever price point you’re at. And don’t forget to check out the weekly ads for drugstores because drugstore brands tend to go on sale!! 🙂

Alrighty, let’s get into the products!

IMG_2102.jpg

  • LOREAL Lash Paradise Waterproof – get it here

With the waterproof version, your mascara aint going nowhere… especially on those days you feel like crying cause the stuff you studied wasn’t on the exam. ..true story..  This mascara keeps the curls, keeping you look put together through all the mess. 🙂 I recently wrote a review on this mascara! Check it out here!! Out of all the drugstore mascaras that I’ve tried in my 23 years of life, this has become my all time favorite!

  • Maybelline The Colossal Big Shot- $7.99-get it here

I’m not going to lie, I bought this mascara because of it’s shiny packaging (darn you pretty packaging). I just naturally gravitated to that shiny gold packaging… There was also that ad with MannyMUA in it with the suitcase of mascaras. Raise your hand if you’ve seen it! 🙋 haha! This is a great everyday mascara to quickly swipe on and run to class. It’s also easy to remove so when you come home from a long day, you can quickly remove it and 💤💤💤!

  • Benefit Roller lash- $24- get it here (travel size $12- get it here)

I bought this mascara in the travel size on a whim because I was trying to reach the minimum to get the free gift at Ulta. (It didn’t work out because I guess travel sizes didn’t count. Oops!) But damn.. this mascara makes my eyelashes looking naturally long and full. It lengthens and keeps the curl throughout the day.

psst… I personally love buying the travel size from Benefit Cosmetics because it’s pretty much half the product and half the price of the regular size. What I mean is, you’re not losing any money by buying the smaller one. It works great for me because I am someone who doesn’t wear makeup everyday. I also love to buy and try new makeup products all the time so I don’t waste anything if I buy the smaller size. Does that make sense? I hope so! haha

  • Tarte lights, camera, lashes- $23-get it here

I first decided to give this mascara a try when there was a bundle sale at Ulta during Black Friday a few years back. It was my first high end mascara so I was pretty excited. This mascara lengthens and volumizes your lashes. The great thing about it is that it does not clump or flake! The price point is terrible in my opinion but whenever theres a special or sale going on Ulta, I restock restock restock!

psst… While i was looking for the link of this product, I noticed that they had this cool set for $21. (check it out here!) It looks like you get one full size and a travel size for $21 dollars! Thats a great deal! Hopefully it comes back into stock soon.

and…

That is it for my eye makeup essentials. I know it wasn’t much but I haven’t tried any eyeliners or eyeshadows lately! I also didn’t wear those products in school so I wouldn’t be much help anyways.

Recently I have been playing with some eyeshadows and learning how to use them on my monolids! That way, I don’t end up looking like I got punched in the eye. That’s not a cute look…

do-you.jpg

As always, thank you so so so much for stopping by. Don’t forget to like, comment, and follow me on this adventure (big button is on your right)! I hope you have a beautiful day and don’t forget to shine bright, you’re beautiful. ❤


Shine bright, peace out.✌


❤ , TIFF


The fine print that no one reads aka the disclaimer: All opinions are my own. I used my own money to buy these products. These links are non-affiliated meaning I don’t make any commission from those links you click on. I just want to make it easier for my readers to see the products I’m talking about. 🙂 ❤


Where to find meh ❤ :

Twitter: @letifffanyshow

Pinterest:@letiffanyshow

Tumblr: http://teafaakneeshow.tumblr.com

Youtube: @letiffanyshow


MAKEUP PRODUCTS EVERY COLLEGE STUDENT SHOULD OWN • FACE EDITION // LETIFFANYSHOW ✨

Hello friends 2

Welcome back to my blog 

Hey whats up hello? Saw yo pretty…face.. and. uh I don’t know the rest of the words..

I hope you are all enjoying what’s left of summer! This gif perfectly describes how I feel about summer ending and my reaction to everything in life. 😂

 crying college kim kardashian new girl keeping up with the kardashians GIF

Anyways, it’s back to school time and I thought I’d share some of my beauty essentials for the school year! This post will be split into three different posts because I tend to rant and I don’t want this post to get too long.

I’ve included both high end and lower end products to help you with options for whichever price point you’re at. Lots of the drugstore brands go on sale so make sure you check out the weekly ads!

Today, I’m going to start with FACE products! 

On a typical day at school, I would put on BB or CC cream for a lightweight coverage, set it with powder, and add color back onto my face with bronzer. If I was going to an social event or going out, I would use foundation instead of BB cream because it had more coverage and I would also add some concealer! I gotta look good for those photos hehe 🙂

Alright, enough rambling, time to get to the good stuff. I hope you enjoy this post and get inspired and… let me know what your typical face makeup routine is!

IMG_2066.jpg

  • Too Faced Hangoverx Replenishing Face Primer – get it here 

Primer is very importante if you want to keep your foundation in place throughout the day! This primer smells like coconuts and will keep your makeup look fresh!

  • Benefit Porefessional PRO balm primer – get it here

One of my favorite primers from Benefit cosmetics! This one makes your pores look nonexistent and keeps your foundation lookin gooood. Perfect for those nights out.. I mean studying. 😉

IMG_2071.jpg

  • Wet n Wild photofocus foundation (soft beige)-$5.99- get it here

Affordable af. $5.99 AND Wet n Wild goes on sale a lot at Rite Aid and CVS! This foundation keeps you looking photo ready for in case ya know, you wanna take selfies with yo besties. (psst. the smell is terrible so if you’re sensitive to smell, I’d avoid this one)

  • NYX BB cream (BBCR03 Golden)- $12.99- get it here

Definitely one of my go-to BB creams. It’s kind of pricey for drugstore but a little goes a long way and it has great results. It blends naturally and looks and feels lightweight. Great for those “no make up make up looks”

  • Tarte Amazonian Clay full coverage foundation (Medium Sand)- get it here

If you’re looking for a great coverage foundation, check this one out!. This foundation applies so smoothly and blends effortlessly. It is said to help improve your skin and has SPF 15 to protect you from those dirty sun rays.

Fun fact: this was one of the first high end foundations I have ever purchased. It was pretty exciting 🙂

  • IT Cosmetics Your Skin But Better CC+ Cream (Medium)-$38- get it here 

I just recently tried this and I instantly fell in love.I love how lightweight it feels on your skin but gives you a fuller coverage than most CC creams I’ve tried. It has a thicker consistency and applies kind of like a gel. Even though I didn’t use this while I was in school, I still think it would be perfect for days you don’t feel like trying but you still wanna look good.

psst. I’m working on a review for this product so click that follow button and you will be notified when I post! 😀 (shameless promo?)

IMG_2076.jpg

  • Maybelline Instant Age Rewind Concealer- $8.99-get it here

I’ve repurchased this concealer many many times! The neutralizer shade helps cover up those dark eye circles from those late night studies! (or nasty hangovers..)

  • NYX HD Studio Concealer – $4.99-get it here

This concealer blends so well and for $4.99, you can’t beat that price. NYX also goes on sale a lot at Ulta so you gotta try it out!

IMG_2085.jpg

  • Maybelline Dream Wonder Powder (Buff Beige)-$8.99- get it here

I’m not a pro at picking out powders but this one has worked for me! It keeps my face looking matte. It also brings color back to my face after applying concealer.

oh yeah.. I’m currently looking for a new drugstore setting powder! if you have any suggestions, please comment below!

  • Coty Airspun Loose Face Powder (translucent)-$7.99- get it here

I’m not gonna lie, I bought this translucent powder because many of the top notch beauty gurus on YouTube swear by it. It was such a struggle to find it but I got it at my local walgreens! You can also get it on Amazon (with prime) here! I love how it looks on my skin but one major downside is the smell. It has a heavy smell of baby powder/makeup my grandma used to wear. But other than that, 8/10 would recommend!

IMG_2087.jpg

  • Wet n Wild Contouring Palette Contour (Caramel Toffee) $4.99- get it here

Wet n Wild makes some of the best products with an affordable price tag! This palette is easy to use and easily blends onto the skin making you look bronzed and beautiful (not like you weren’t beautiful before). The banana powder looking thing is great for setting your under eye concealer!

  • Benefit Hoola Bronzer- $29-get it here

I have the trial size which is $15 but I fell in love with this bronzer. I saw it in a lot of YouTube videos (damn it YouTube) and I finally gave in. No regrets tho! It enhances the features on your face. I like to apply it on the outside parameters of my face to give some color to my skin.

img_2092.jpg

  • Benefit Dandelion Twinkle- $29- get it here

This is my favorite powder highlighter in the whole entire world! It’s the perfect nudish pinky color and I love how it makes your face gloooww  in the sunlight! The staying power is pretty darn good.

It is high end as it retails for $29 but I think it’s worth the splurging, especially if you use it often.

  • Maybelline Strobing Stick Illuminating Highlighter-$8.99- get it here 

I think this may have been the first highlighter I ever tried and I loved it. It’s creamy and glides effortlessly onto your skin. It’s also easy to blend with your fingers or a brush! There are often deals around Maybelline at drugstores and Ulta so the next time you drop by, pick one up and try it out yourself!

and…

That is it for my back to school beauty essentials: face edition!

I really hope you enjoyed this post. Like, comment your favorite FACE routine and follow my blog if you haven’t already! 😀 We’re at 34 subscribers (and none of them are me)! Although 34 doesn’t seem a lot, I never expected for anyone to look at my blog. So thank you soo soo much for following my blog or even taking a second to stop by! I hope you have a beautiful day and don’t forget to shine bright, you’re beautiful ❤


Shine bright, peace out.✌


❤ , TIFF

The fine print that no one reads aka the disclaimer: All opinions are my own. I used my own money to buy these products. OH and these links are non-affiliated meaning I don’t make any commission from those links you click on. I just want to make it easier for my readers to see the products I’m talking about. 🙂 ❤


Where to find meh ❤ :

Twitter: @letifffanyshow

Pinterest:@letiffanyshow

Tumblr: http://teafaakneeshow.tumblr.com

Youtube: @letiffanyshow

SH*T YOU ACTUALLY NEED IN COLLEGE ✏️ // LETIFFANYSHOW

Hello friends!

Welcome back to my blog 

It’s back to school season ✏️ and I’m starting aseries of back to school posts!

Today, I thought I’d share some of my favorite must-have essentials for school! I know, I know…school sucks but new school supplies are fun, right? I’ve always loved the beginning of a new school year/semester because it was like a fresh new start. It was a new opportunity to do well in school! Then three weeks into the semester, I regret it and start dragging my feet through the rest of the semester. Anyone else like that?

Anyways, these are the things that I found useful during my collegiate years and hopefully they inspire you! Also, good luck in school! You got this! 💪

»Reliable Laptop 

laptop.jpg

Your laptop is pretty much your life in college so pick a good one! All of my assignments were done on computer, submitted online, and graded online. I know right? Technology these days. But it is what it is. Plus, it’s exciting getting your own portable computer! I went into college with a MacBook Pro and then spring semester of junior year, it crashed. Right in the middle of finals week too! What a shame… It lived a short 3 years. I ended up going out and purchasing a Macbook Air that summer and it is what I’m using right now to type this blog post! I’m not a very techy person (actually, I’m not a tech person at all!) but size/weight wise, I prefer my MacBook air! Space wise.. I miss my MacBook Pro.

»Sturdy Backpack

A reliable and sturdy backpack was very important for me because I usually stayed at school in between classes to avoid re-parking my car. This means I would have to haul all of my study materials to school and back. I started off college with a regular backpack, nothing special. Turns out, the lack of padding wasn’t just doing it for me so I decided to upgrade to a backpack with better support. I got a Dakine backpack with a laptop slot to protect my laptop during travel. I can’t find the exact one I have but I’ll link similar ones here and here.

I’m also linking some of my favorite backpacks below:

I’m also obsessed with the North Face back packs! (here)

I lowkey might splurge on a Herschel backpack for nursing school. (here)

JanSport backpacks were always one of my favorites! I loved the ones with the brown suede looking bottoms! (here)

»Colored pens + highlighters + markers

highlighters.jpg

I LOVE COLOR CODING AND HIGHLIGHTING THINGS. It makes studying fun and effective. I also learn by visuals so the colors really help me retain information. Get yourself a good pack of colored pens. I have the Pilot G2 pens in 0.7mm (Get it here). For highlighters, I recently discovered the Zebra mildliners in pastel colors (get it here). I instantly fell in love with the pastel colors because they were exactly the aesthetics I was looking for in my notes. There are also other colors I haven’t tried yet but they’re sitting in my Amazon cart as we speak! I might give in.. heh Markers were a must have for me (here are my favs). I used them to color code my notes, which made it more vibrant and eye catching. Who doesn’t love eye catching notes?

»No.2 Pencils

pencil.jpg

You don’t want to be one of those people without a pencil on exam day, right? Right.. Keep a pencil or two in your backpack just for incase. You never know! My favorite pencils are Pilot 2020 0.5 SuperGrip. You can’t get these at your local Target or Walmart but stationary stores like MaiDo sells them. Don’t have a MaiDo near you? You can also check them out here! It is on the pricier side but they last a very long time. Very good quality, 10/10 would recommend. Plus, you can amaze your friends by how the lead comes out by shaking the pencil. Yasssss 🙌

»White out

Everybody makes mistakes! Everybody has those days! I could not live without white out. Yes, I was one of those people that used white out on exams haha! But eventually I gave up and started crossing things out like a normal person cause I’d literally run out of time if I tried to white out every single mistake. But, with my notes, I wanted to keep it crisp and clean so white out was the way to go! I have the Costco pack and I’m still working on it.

»Planner

planner 2.jpg

IMG_2049.jpg

I don’t think I could get through college without my planner. With school, greek life, social events and even personal time, a planner helped me stay sane. I went through so many planners and I finally found the one that works for me! The Happy Planner by Create 365// Me and My Big Ideas is one of my favorite planners to use (find it here). I love that it has three boxes per day, which allows me to space out my plans. I also unleashed my creativity into this planner with washi tape and the possibilities are endless. You can check out my favorite washi tape rolls here and here.

If you love the Erin Condren planner but don’t want to spend that hefty price tag, check out the dupe from Michaels (here).

Tjmaxx and Marshalls also have really cute and affordable planners!

»Calculator

I was a bio major in college and calculators were used more often than I imagined. I used mine in math, physics, and even my microbiology course! My favorite calculator is the Texas Instruments TI-30XS Multiview Scientific Calculator (get it here) I didn’t really use my graphing calculator but the one I had was the Texas Instruments TI-84 Graphing Calculator in Grey (get it here)! All of my courses didn’t allow graphing calculators on exams and of course, no cell phones… so a good quality scientific calculator is a must have!

»External hard drives

harddrive copy.jpg

External hard drives are not required in college but I highly recommend it. There may be a time where your laptop decides to crash *cries* and you lose all your work/memories. BUT if you regularly back it up and  your computer decides to crash, then you’ll have a back up of your stuff! I learned my lesson and bought one when I got my new computer. On the Mac, you can use the app “Time Machine”  that is already install on your computer to help you back up your whole hard drive onto the external hard drive. I got mine at best buy. They also sell it at stores like Costco, Target, etc.

»Earphones

In college, you are hardly alone. You have roommates, housemates, apartment mates..even in the library, you are surrounded by people. Some people are just loud af and inconsiderate so THATS WHY earphones are a must. Let music block out the sounds and let you resume in studying! I have the Apple earpods that came with my iPhone 6.

»Whiteboard + good quality whiteboard markers

During my last few semesters of college, I realized that whiteboards were the perfect way for me to study. As a bio major, I had a lot of information to remember and the way that helped me remember was repetition. A lot of things require practice and a white board was a great way to practice! Practice makes (almost) perfect, right? I got this gigantic whiteboard from Costco and the space is infinite. I recommend getting different colored whiteboard markers because it helped me color code and draw everything out. I didn’t get A’s on my exams but I didn’t fail either. 😉

»Reusable water bottle

water bottle.jpg

A reusable water bottle is important to keep hydrated during your day at school. My campus had these “hydration stations” that made it super easy to refill your water bottle. It was pretty cool cause it kept track of how many plastic water bottles you are saving by using the hydration station. I tested out various water bottles but one of my favorite was the Sip by Swell bottle from Target (get it here). It kept my water cold all day and there were so many cute colors. You can also put hot liquids in there so if you like hot and cold drinks, this is the bottle for you!

What are your back to school essentials? Let me know below in the comments!

Remember to like this post, comment, or stay awhile and press that follow button! Check out my social medias and I hope you have a great school year!

Thank you for stopping by and see ya later!

Shine bright, peace out.✌

❤ , TIFF

The fine print that no one reads aka the disclaimer: All opinions are my own. I used my own money to buy this product. OH and these links are non-affiliated. I just want to make it easier for my readers to see the products I’m talking about. 🙂 ❤


Where to find meh ❤ :

Twitter: @letifffanyshow

Pinterest:@letiffanyshow

Tumblr: http://teafaakneeshow.tumblr.com

Youtube: @letiffanyshow


BUBBLY CLAY MASK // LETIFFANYSHOW

Hello friends 3

Welcome back to my blog!

I have been seeing reviews of this bubbly mask that pretty much makes you look like that episode of Spongebob where Squidward is covered in cement.

squidward.jpeg

I’ve seen this product on the land of Youtube and on Instagram. So what is it? This mask is called the Carbonated Bubble Clay Mask from Elizavecca Milky Piggy. You can find it on amazon for about $10.90 with amazon prime (free shipping)! Amazon prime was definitely a deciding factor in whether to try this mask or not. And of course, I had to try the magical bubbling mask!

IMG_8661.JPG

Elizzavecca Milk Piggy Carbonated Bubble Clay Mask ($10.90)| Find it here!

This mask is packed with powerful ingredients such as charcoal powder, green tea, collagen and many more.

Charcoal decreases pore sizes, reduces oily skin and treats acne.

Green tea has anti-aging properties that delays skin aging.

Collagen reduces signs of aging.

The mask bubbles and bubbles on your skin to remove dead skin cells and unclog your pores. This leaves your pores tighter and helps fight against future clogging.

// Quantity: 100g // Use 2x to 3x a week // Use as makeup remover or foaming cleanser //

IMG_8663.JPG

IMG_8662.JPG

How I use it:

The clay mask comes with a tiny spatula. I use the tiny spatula to slap some onto my face and then I use my fingers to spread it out. Avoid getting it too close to the eyes, nostrils and lip area. The bubbles will expand and end up in very awkward places. (Trust me, I’ve made the mistake heh oops!)

TIP: I recommend starting out with a small amount and then build up from there. A little goes a lot way!

IMG_8660.JPG

I put wayy too little on my forehead! OOPS! But usually I’d put more. 🙂

As soon as you apply it, the product will start tingling! I wait about 15 minutes or when the bubbles have fully bubbled out and my face pretty resembles the picture of Squidward above. (oof it tickles!) Then I massage the product into my face for about a minute or so and head over to shower and remove the face mask.

IMG_8672.JPG

TIP: Make sure you tightly close the container because it may dry out. The product also oxidizes in air so tightly close the container to preserve the product!

Things I like 😊:

This is a really fun mask to use! I love that it applies as a gooey clay and then transforms into bubbles! It also has a tingling sensation that tickles! After washing it off, my face felt softer like a baby’s butt! I noticed that my skin is less oily and my pores have gotten smaller, which mean success!

Things I Don’t Like 😞:

I don’t like how difficult it is to remove this product. The clay mask is so thick and gooey that even after massaging it for a while, it doesn’t go anywhere! That’s why I use it before I shower. Then during my shower, I am able to scrub scrub scrub and finally get it off.

Do you guys have this issue too? Let me know if you have any suggestions on how to remove this mask!

Also, if you must know, this clay mask tastes disgusting! haha! While showering, the water residue went into my mouth and blah. Avoid ingesting. 🙂

Have you tried this bubbly clay mask? What do you think? Let me know what masks I should try!

Remember to like, comment, or stay awhile and follow my blog! Thank you for stopping by and I’ll talk to you next time!

Shine bright, peace out.✌

❤ , TIFF

The fine print that no one reads aka the disclaimer: All opinions are my own. I used my own money to buy this product. OH and these links are non-affiliated. I just want to make it easier for my readers to see the products I’m talking about. 🙂 ❤


Where to find meh ❤ :

Youtube: @letiffanyshow

Twitter: @letifffanyshow

Pinterest:@letiffanyshow

Tumblr: http://teafaakneeshow.tumblr.com


NEW FAVORITE LIGHTWEIGHT SUMMER FOUNDATION // LETIFFANYSHOW

IMG_8632

I’m not going to lie, I suck at matching foundation colors to my skin. And when I was at Sephora staring at these bottles of foundations, they all looked the same to me. Light sand? Medium sand? …Help…?

HELLO FRIENDS

Welcome back to my blog!

Today I’m doing a review of the Tarte Rainforest of the Sea foundation! This foundation retails for $39 and it claims to be a lightweight, full coverage, hydrating foundation with a SPF 15. It comes in 21 shades- I am in the shade  light-medium sand. (You know, I always wondered how they came up with these foundation names.. )Thinking Face on Apple iOS 10.3The Sephora website also says that this product is hypoallergenic and dermatologist tested. Lastly, the bottle is made of glass and contains 1 fl. oz of product.

Let’s start off with the box it comes in. I LOVE PRETTY PACKAGING like if you put a shitty product in pretty packaging, I might actually buy it. The applicator itself is a dropper. I’m not crazy about the dropper because I’m not sure what to do with it. The website says to directly dispense the foundation onto a foundation brush, but I prefer to drop it onto the back of my hand first and then dab it onto my skin. I tend to waste product when I directly put it on a brush or sponge.

This foundation has a floraly sunscreen kind of smell but it’s not terrible. It’s not noticeable after it’s been applied to the skin. With a primer (the primer I used was the Too Faced Hangover Replenishing Face Primer), it went on my face super smoothly and stayed on throughout the day.

This foundation has a runny, watery consistency cause ya know, “water foundation”. It applies well on my skin with either my Real Techniques foundation brush or my Clarisonic foundation brush. I prefer applying it with the Clarisonic foundation brush. That brush just blends everything.

I tried making a video showing you how I like to apply the foundation! LOL my first “beauty” video ever! Check it out!

I found that a lot goes a long way, so I like to start with a drop of foundation and build up from there. When I first started using this foundation, I think I used wayyy too much and it started to look cakey. I learned that one drop from the dropper is enough and then I could always add more to where there are imperfections. I don’t find it full coverage but I think it’s buildable.  I enjoyed how lightweight it is because I’m all about that “no makeup makeup look”. This foundation would be ideal for those hotter summer days 🌞and maybe even humid weather.

I’ve been loving this product and it has been my go-to for these warmer days. The dropper is eh but it makes me feel like I’m in a lab or something. HEHE but that is pretty much it!

Have you tried this foundation? What did you think of it? Let me know what you think! Make sure to like, comment, ask questions… er look around my blog if you’d like..laugh at my posts heheh OKAY SEE YOU NEXT TIME ❤

Shine bright, peace out.✌

❤ , TIFF

The fine print that no one reads aka the disclaimer: All opinions are my own. I used my own money to buy this product. OH and these links are non-affiliated. I just want to make it easier for my readers to see the products I’m talking about. 🙂 ❤


Where to find meh ❤ :

Pinterest:@letiffanyshow

Youtube: @letiffanyshow

Tumblr: http://teafaakneeshow.tumblr.com

Twitter: @letifffanyshow

YOUTUBE VIDEO MUSIC CREDS:

Song: Colorful spots // Artist: Nicolai Heidlas Music